

Starting a collaborative project with a class in another country is one of the most rewarding things you can do as a teacher. It is also one of the easiest to postpone. Not because the idea is too big. But because without a clear plan, it is hard to know where to begin.
A good collaborative project checklist turns a complex experience into a series of small, doable steps. Before the project starts, you prepare. While students are working, you keep things moving. After the last activity is done, you close the experience in a way that makes the learning last.
This guide gives you a practical collaborative project checklist for all three stages — before, during, and after — so your first (or next) international collaboration feels organized and well within reach. Nine steps in total. Each one takes less time than you might expect.
Your Collaborative Project Checklist: Before You Start
The preparation stage is where most international projects succeed or fail. Teachers who spend 30 to 60 minutes planning before they launch almost always have smoother projects than those who jump straight into the first activity. A little structure at the start saves a lot of confusion later. These three steps together take about one hour — and that one hour protects everything that comes after.
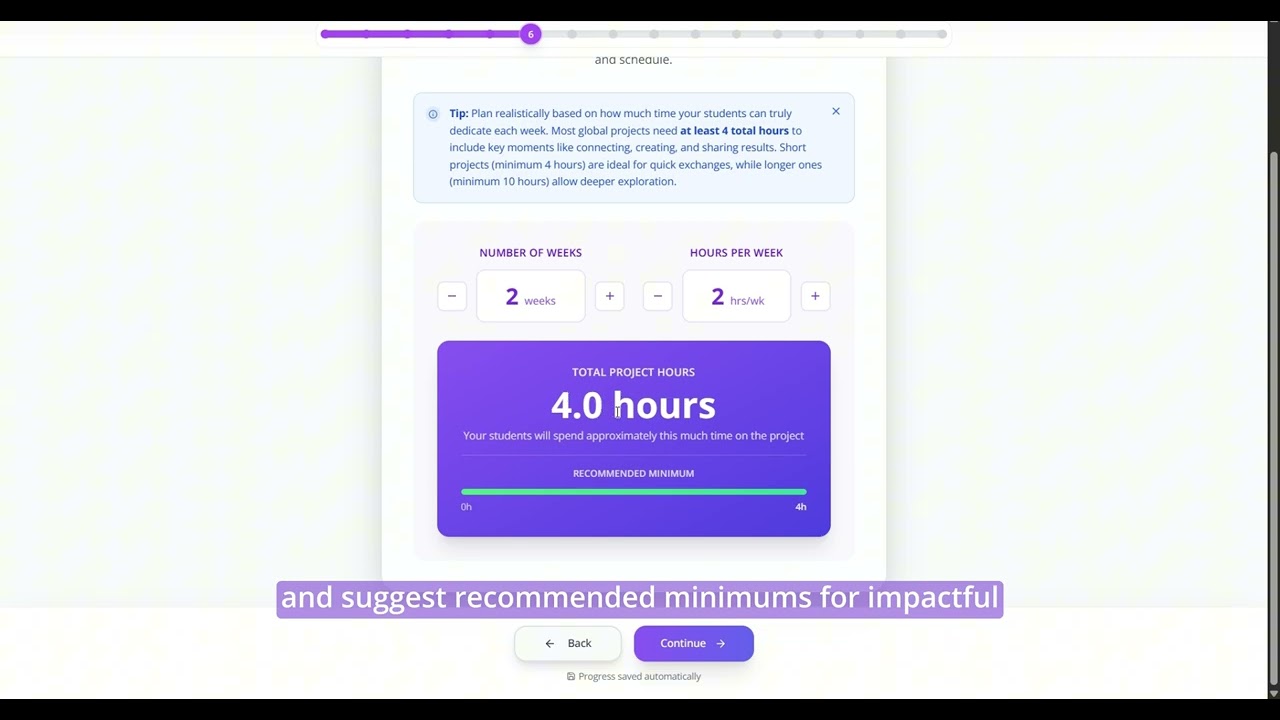
Step 1. Define your topic and build your plan with the Project Assistant.
Class2Class offers three project approaches. In the Explore Cultures approach, students discover the traditions, languages, and daily life of a partner class. In the Explore Global Challenges approach, they investigate a global challenge — such as climate change or food security — through the UN’s Sustainable Development Goals. In the Create Solutions approach, teams co-design an original response to a real-world problem. For teachers who are new to international collaboration, Explore Cultures is the easiest starting point. An Explore Cultures project can run in one or two hours and needs only a short, structured exchange between two classrooms.
Once you pick your approach, the Project Definition Assistant (PDA) on Class2Class guides you through the rest of the planning. You describe your topic and learning goal, set the student age range, and choose your approach. The assistant builds a full activity sequence — an Icebreaker, Working in Class activities, a Presentation, and a Reflection — based on what you share. You can adjust any part at any time. The final project is always yours to shape.
A video tutorial on how to create a project in simple steps with the Project Assistant.
Step 2. Find your partner class and set a shared timeline.
Once your project is ready, the platform matches you with a teacher in a different country whose class fits your topic and age range. You do not need to find a partner on your own. When you are matched, send a short introduction: your name, your country, and one or two things you are looking forward to. Keep it simple and warm. That first message sets the tone for everything that follows.
Together with your partner teacher, confirm the dates that matter most: when students first connect, when they exchange work, and when they present the final product. Also agree on the language you will use to communicate — most C2C projects run in English, but the platform supports others. Write these dates into your lesson plan before the project starts. A shared timeline prevents most scheduling problems from ever happening.
Step 3. Prepare your students before the first exchange.
Tell students who the partner class is and where they are from. Explain what the project will ask them to do and why. The First International Project Guide on Class2Class includes ready-to-use conversation starters and preparation tips. Students who understand the plan before it starts are more confident, more curious, and more willing to take small risks with students they have never met.
Research on project-based learning (PBL) — students learn by investigating a real question and building something to share — shows that structured preparation significantly improves both student outcomes and teacher confidence (Condliffe et al., 2017). Your collaborative project checklist for the before stage is that structure.
During the Project: Keep the Collaboration Moving
Once the project is running, the risk is losing momentum. Students get busy. Partner classes fall behind. Messages go unanswered for a week. This part of your collaborative project checklist is about keeping everything on track — from the first exchange to the last activity. Three focused actions are all you need.
Step 4. Start with the Icebreaker.
An Icebreaker is a short first-contact activity — usually 20 to 30 minutes — where both classes meet before the real work begins. This might be a video where each class introduces itself, a short survey about local food or music, or a live exchange of questions and answers. The Icebreaker is optional, but strongly recommended. Students who feel comfortable with their partner class collaborate more openly during everything that follows. It is often the step that turns collaboration from an assignment into a real connection.
Step 5. Assign roles and exchange work with the partner class
During the Working in Class activities, give each student a clear role: researcher, writer, designer, or coordinator. When everyone has a job, no one hides and no one carries the whole team. Role assignment supports the Collaboration & Teamwork competency — one of the eight core competencies in the C2C Educational Model — by making distributed responsibility visible and practiced.
Then comes the step that makes the project genuinely collaborative and not just parallel: each class shares what they are building — a draft, a short video, a document, a set of images — and the partner class reads it, responds to it, or builds on it. Without this exchange, both classes are doing similar work in isolation. With it, they are actually learning from each other.
C2C Mission: Voices for Peace; a collaborative project where students shared their thoughts on peace.
Step 6. Stay in sync: check in with your class and with the partner teacher.
A weekly message to your partner teacher takes two minutes. Ask if their class is on schedule, share any changes to your own timeline, and flag any technical issues early. Research on COIL (Collaborative Online International Learning) — the transversal framework that makes C2C projects collaborative and global — shows that regular communication between partner teachers is one of the strongest predictors of student engagement and project completion (O’Dowd, 2018).
At the same time, pause with your own class every two or three sessions for five minutes. Are all teams moving? Is anyone stuck on a task or struggling with the technology? Is any team missing feedback from the partner class? A brief check-in can prevent a team from falling behind and never recovering. It is also a chance to notice who is stepping up and who might benefit from a different role.
After the Project: Complete Your Collaborative Project Checklist
The final stage of your collaborative project checklist is the one most often rushed. Once the last Working in Class activity is done, it can feel like the project is over. But the Reflection and Presentation phases — the last two of the four C2C project phases — are where the deepest learning happens and where students make sense of everything they experienced.
Step 7. Run a Reflection and share the final product.
Ask students to think back on the whole project. What did they learn about the topic? What surprised them about the partner class? What would they do differently next time? Structured reflection helps students connect the experience to what they already knew, and it produces group-level evidence (E4 in the C2C framework) that shows how the class developed its competencies during the project.
Then give the project a real audience. Students can share their work with the partner class in a live session, post a video that families can watch, or display their product at a school event. The Presentation phase tells students that what they made matters — not just to the teacher, but to other people. Combining reflection with a public share turns a good activity into a complete learning experience.
Step 8. Close well: celebrate and take ten minutes to document.
A short closing session — even 15 minutes — gives both classes a sense of completion. Thank the partner teacher. Let students say goodbye, share a final message, or name their favorite moment from the project. This matters more than it might seem. Ending a collaborative project well makes both classes more willing to start the next one.
Right after the session, take 10 minutes to write two or three notes for yourself. What went well? What would you adjust? Which activity worked better than you expected? A few honest lines in a notebook or a shared document are enough to build on the next time you run an international collaboration.
Step 9. Review the Changemaker Journey.
The Changemaker Journey is the student recognition path in the C2C framework. After each project, you can confirm which level — Explorer, Collaborator, Impact Creator, or Changemaker — best describes what your students demonstrated in the key competencies. This is always your decision, based on what you observed throughout the project. The platform’s assistant can suggest possible levels based on the group’s evidence, but you make the final call.
The OECD Learning Compass 2030 describes student agency as something built through repeated cycles of experience, reflection, and choice. A closing phase that takes reflection seriously is one of the most direct ways to help students develop that agency over time.
Three Stages, Nine Steps
Most teachers who feel hesitant about international collaboration are not missing skill or creativity. They are missing a clear list of what to do and when to do it. That is what a collaborative project checklist gives you.
Before the project: define your topic and build your plan, find your partner and set a shared timeline, and prepare your students. During the project: run the Icebreaker, assign roles and exchange work with the partner class, and stay in sync with everyone. After the project: reflect and share the final product, close well and document, and review the Changemaker Journey.
Nine steps. Three stages. One international collaboration — and a collaborative project checklist that fits on a single page.
Start small. An Explore Cultures project that runs in two hours counts. Every competency your students practice, every question they ask a peer in another country, every reflection they write — all of it is real learning. Your first project does not have to be perfect. It just has to start.
Ready to Launch Your First Collaborative Project?
Create a free Class2Class account and open the Project Definition Assistant. In about 15 minutes, you will have a full project plan — topic, partner class profile, activity sequence, and timeline. Keep this collaborative project checklist close and follow one stage at a time. The platform handles the partner matching. You focus on your class.
References
- Steps to Start Your First International Collaboration Project — Class2Class
- First International Project Guide — Class2Class
- Project Assistant on Class2Class
- The 8 C2C Competencies: What They Are and Why They Matter — Class2Class
- Condliffe, B., Quint, J., Visher, M., et al. (2017). Project-Based Learning: A Literature Review. MDRC.
- O’Dowd, R. (2018). From telecollaboration to virtual exchange: State-of-the-art and the role of UNICollaboration in moving forward. Journal of Virtual Exchange, 1(1).
- OECD (2018). [The Future of Education and Skills 2030: OECD Learning Compass.]